 Today, we’re sharing a behind-the-scenes look at the creation of one of our favorite folder design templates. This Cruise Ship Adventure Presentation Folder Template uses a simple clipping mask to make the image of the ship appear to be split into several rounded square tile shapes.
The end result looks like something that would take a long time to make from scratch, but you can create it using Adobe Illustrator and Photoshop in just a few simple steps with this handy tutorial.
Creating the Tile Design in Illustrator
1. Before we work with the actual photograph, we need to first use Illustrator to create the basic tile shapes that we’ll bring into Photoshop later. Begin by selecting the Rounded Rectangle tool and creating a rectangle sized at 0.5″ x 0.5″.
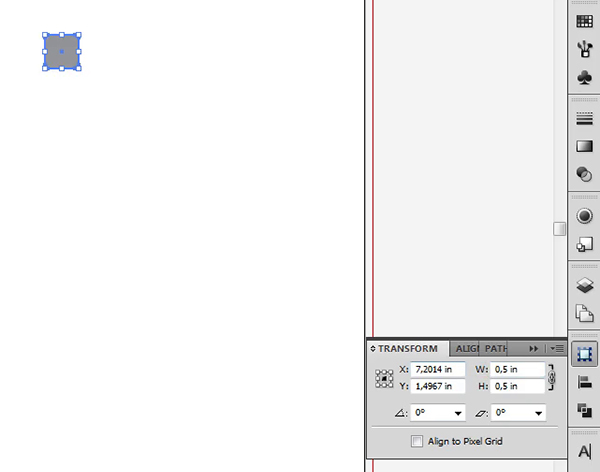
2. Right click on your newly created rectangle and select Transform -> Move Section. Set the horizontal position at 0.53″ and vertical at 0″, and then press the Copy button. This will create a copy of the rectangle directly next to the original.
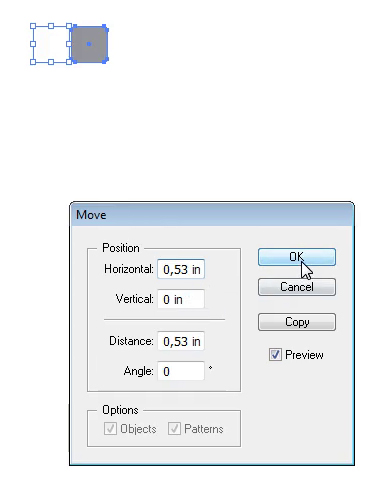
Pro tip: If you prefer keyboard shortcuts, use Shift+Ctrl+M to bring up the Move Section window.
3. Copy the rectangle shape four more times for a total of six rectangles altogether. Click Object -> Transform -> Transform Again to complete this action.
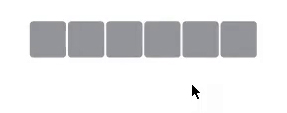
Pro tip: The easiest way to duplicate the rectangle object is to use the Ctrl+D keyboard shortcut. Just make sure you have the rectangle selected before you use this shortcut.
4. Select all six of your rounded rectangles, right click on one of them, and select Transform -> Move Section (or Shift+Ctrl+M.) This time, do the opposite as before and set the horizontal position at 0″ and the vertical at 0.53″, and then press the Copy button. This will create another row of rounded rectangles underneath the first.
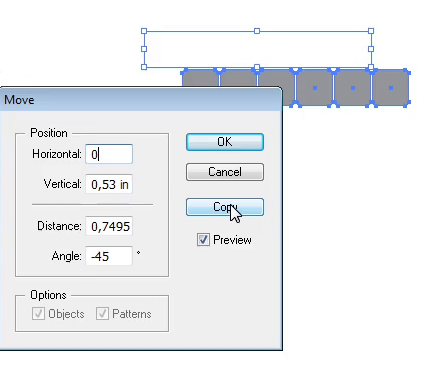
5. Continue copying the rectangle objects until you have made seven rows total. Once again, you can perform this action by right clicking on one of the objects and selecting Transform -> Transform Again, or with the Ctrl+D keyboard shortcut.
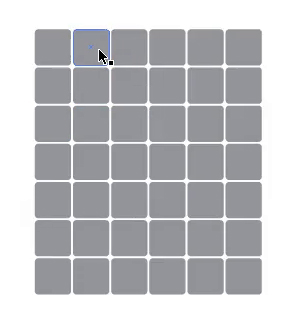
6. Now that we have all of our rectangles, it’s time to start getting rid of the ones we don’t need. Delete the three rectangles in the upper left hand corner, like in the diagram provided.
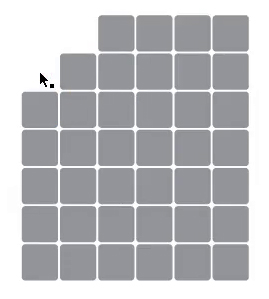
7. Select one of the rectangles in the center and enlarge it so that it’s three times as big as before. The easiest way to do this is to simply stretch it out using your mouse so that it covers a 3×3 grid of rectangles.
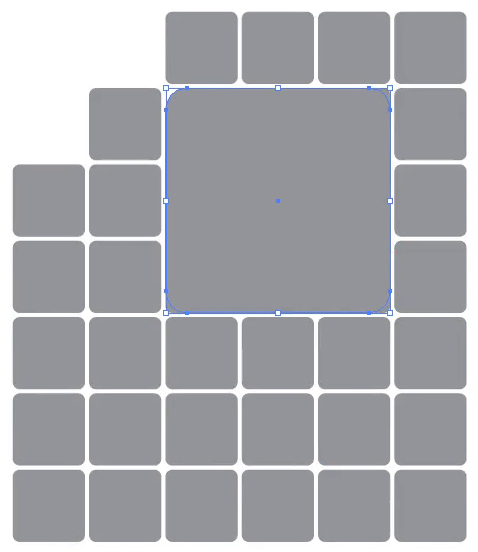
8. You need to get rid of all the rectangles underneath before continuing, so select the giant rectangle and cut it out by selecting Object -> Cut (or using Ctrl+X). Select all of the rectangles that were previously covered by the giant rectangle and press the delete key to clear them out. Now select Edit -> Paste in Front (or use Ctrl+F) to bring the giant rectangle back into play.
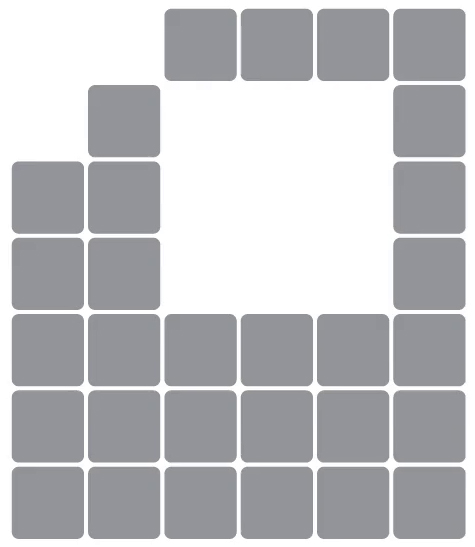
9. Now we’re going to recolor some of the rectangles. Select the first batch of rectangles (check the diagram for detail), click on the Color tool and set the values at C:100/M:90/Y:5/K:0 to create the dark blue tone.
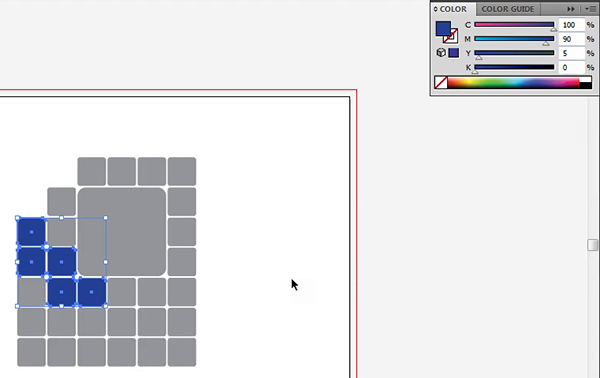
Then select the next batch of rectangles and recolor them with the Color tool by setting the values at C:70/M:0/Y:15/K:0 to create the cyan tone.
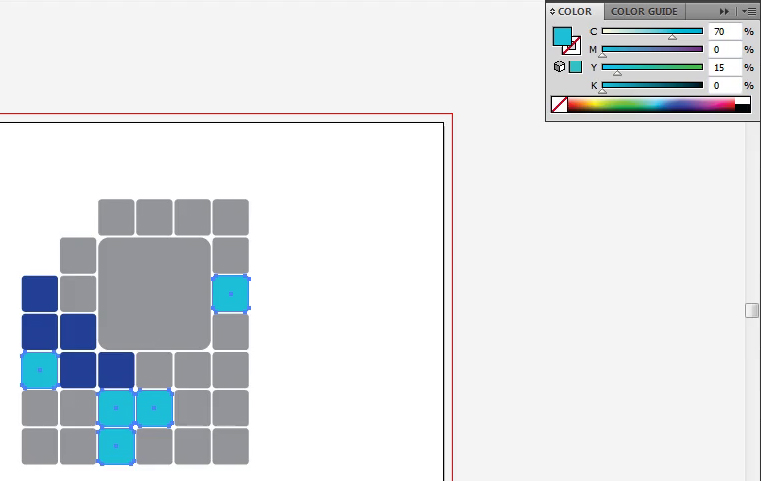
10. Delete the remaining gray-colored rectangles in the lower-left hand corner and the bottom-most row so that your design matches the diagram.
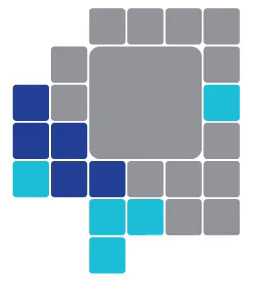
11. Select all of the rounded rectangle objects, click on the Transform tool and set the angle of the objects at -45 degrees.
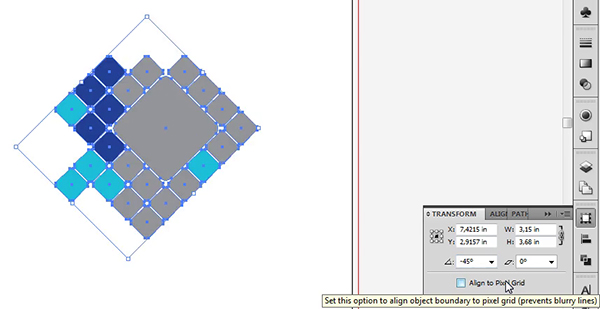
Congratulations, your rounded rectangles have just become rounded diamonds and the design element is basically complete—but there’s still one last thing we need to do before we can use it in the template.
12. We need to group together the diamond shapes so that all of the gray-colored objects are on one layer and all the recolored objects are on another layer. Select the gray objects and click Object -> Group (or Ctrl+G) to group them together. Repeat this action for the remaining colored objects. The gray objects will become the Shape-1 layer in Photoshop, while the colored objects will occupy the Shape-2 layer.
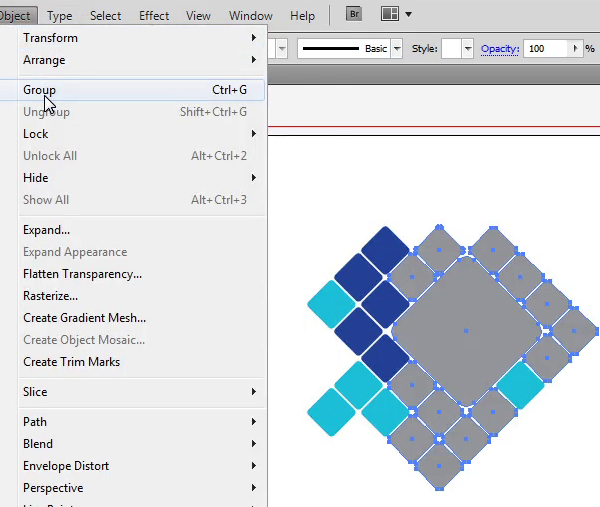
Pro tip: To easily select all of the objects with the same color, use the Direct Selection Tool and click Select -> Same to set the tool to select all objects with the same color as the one you click on.
Now that you’ve completed the rounded rectangle design element, save it as an AI file so you can use import it into the template or use it for future designs. You might even try altering it further to see where your imagination takes you.
Creating a Clipping Mask and Other Details in Photoshop
Next up, we’ll show you how to apply the image we created in Illustrator to a photo in Photoshop—in this case, the ship photo from our folder template.
1. Create a new document with the size set at 18.25″ x 16.5″, 300 DPI and CMYK color mode.
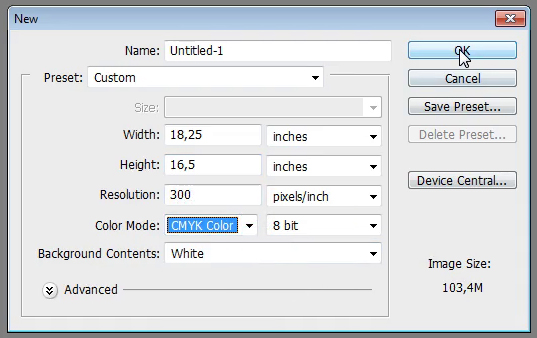
Pro tip: This size is to accommodate the bleed area for the final printed product. The size without bleeds is 18″ x 16.25″.
2. Import the AI file containing the die-cut template for the folder. To center it on the canvas, select both the object layer and the background layer, then use the Horizontal Align Tool and Vertical Align Tool from the transform menu.
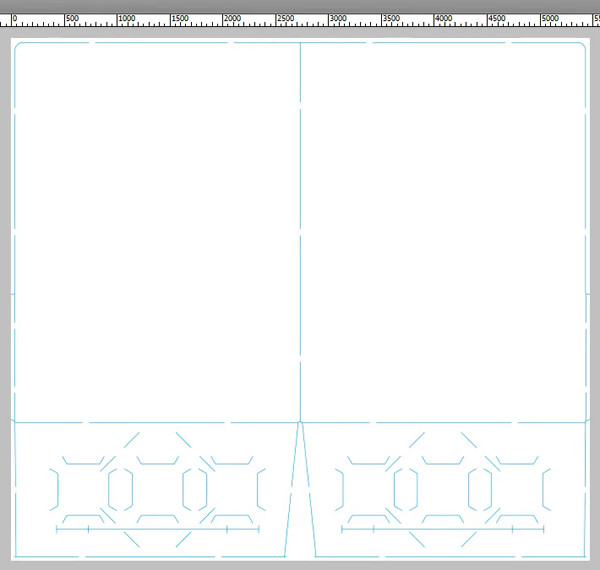
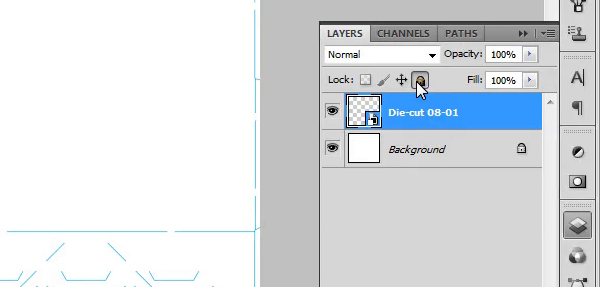
3. Lock the die-cut layer. This is a crucial step, as accidentally altering the die-cut will create complications when you go to print the final product.
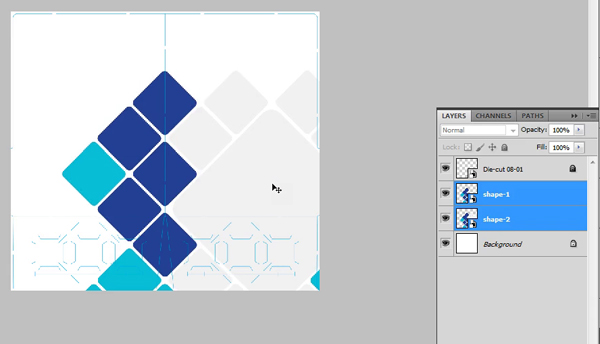
4. Import (as a Smart Object) the AI file of the rounded rectangle tile design you created previously. You will need to do this twice, so label one Shape-1 and the other Shape-2. Place them on the bottom right corner, one on top of the other.
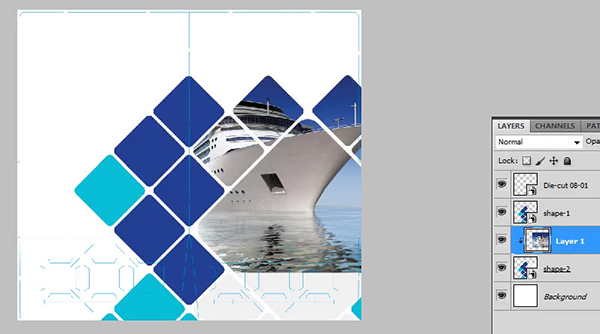
5. Import the image of the cruise ship and place it on a layer above the Shape-2 layer. Create a clipping mask by right-clicking on the cruise ship layer and selecting Create Clipping Mask.
Pro tip: You can also create a clipping mask by selecting the cruise ship layer, holding down the ALT key, and clicking between the ship layer and the Shape-2 layer.
6. Move the picture of the cruise ship so that it’s in the same position as the diagram. Don’t worry about the image overlapping the die-cut lines; this excess portion will be covered up by our next image.
7. Next we’ll import the photo of the father and son and place it on a layer above the picture of the cruise ship. Since this picture is going on the inside pocket of the folder, it has to be placed upside down. Rotate the image 180 degrees and then select Edit -> Transform -> Flip Horizontally.

8. Set the image as a clipping mask above the Shape-2 layer, just as you did with the picture of the cruise ship. Move the picture so that it occupies the space on the inside pocket. Line up the picture of the father and son using the included diagram as a reference.
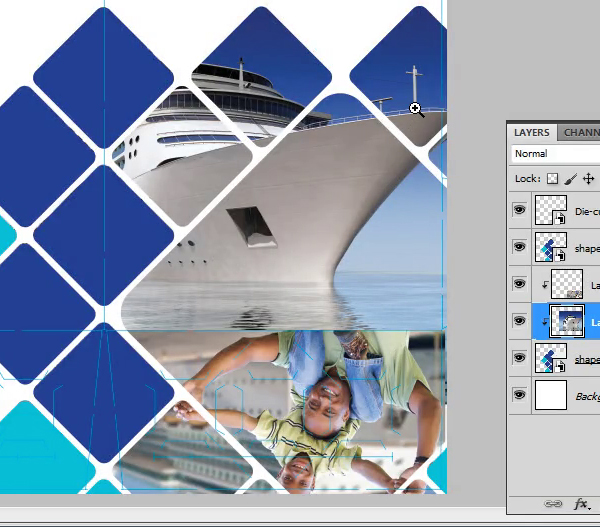
Pro tip: It’s important this time that you do not overlap the die cut line, or else the picture will bleed onto the front cover when printed.
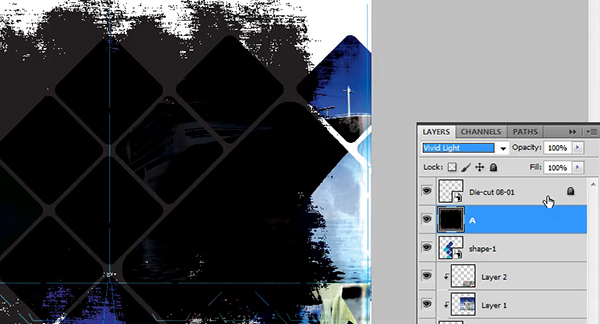
9. This next part is technically optional, but we’re going to add a shadowy texture pattern to give both photos a more natural look. You can find many free texture resources online (such as our own paper texture pack). Import the texture image and place it on a layer above Shape-1. Rename this layer “A,” since we’ll be duplicating the same texture in the next step. Set the blend mode for layer “A” so that it’s on Vivid Light with a 50% Fill.
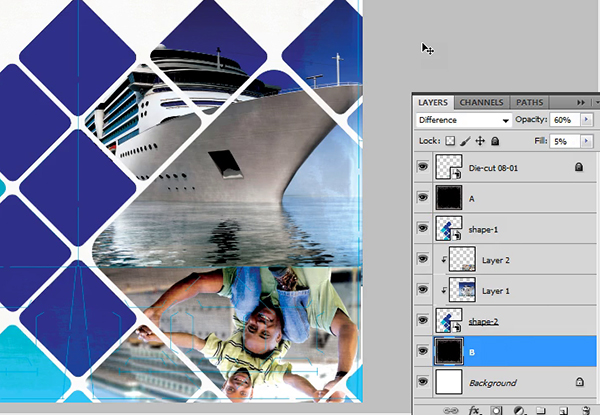
10. Duplicate layer “A” and give the new layer a name to differentiate it from the original (we’ll call it layer “B”). Place this layer on the bottom, right above the background layer, and set the blend mode to Difference, with a 60% Opacity and 5% Fill.
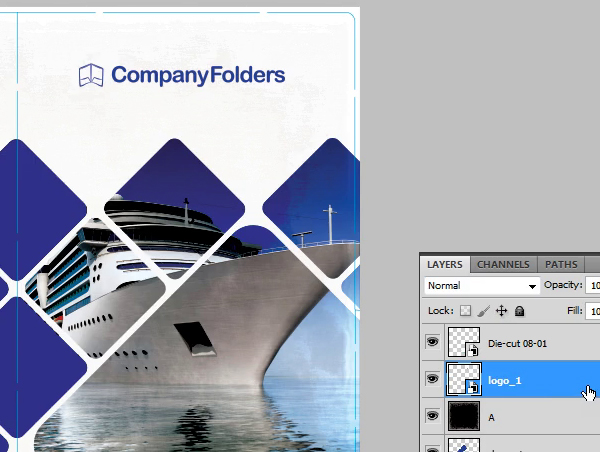
11. Import your company logo (we’re using the Company Folders logo in AI format as an example) and move it to the top of the front cover.
12. Import the company logo again, but this time rotate it 180 degrees and shrink it down so that it will fit on the interior pocket.
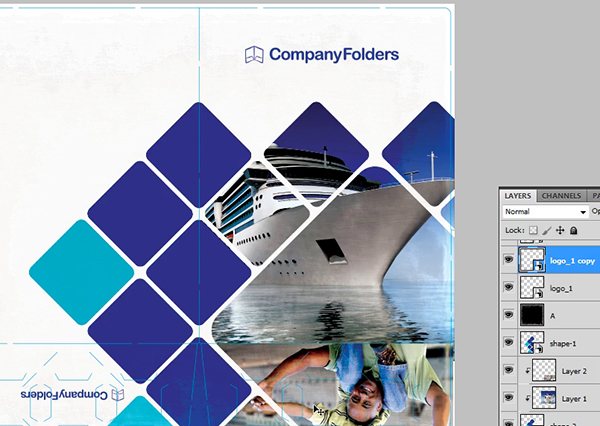
13. Add a slogan underneath the front cover logo. We used the font Brie Light Faux Italic in our template, but feel free to choose your own.
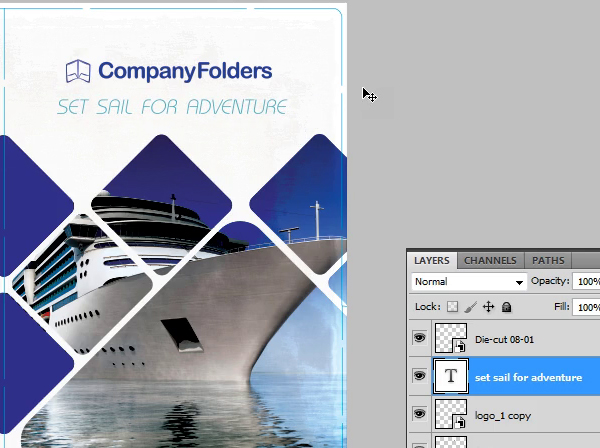
14. Duplicate the slogan text, rotate it 180 degrees, and resize it so that it fits underneath the logo on the interior pocket.

15. Add pertinent contact information on the back, such as the company address, phone number, e-mail address and website URL. For this section, we used Myriad Pro Italic. Resize the text so that it fits inside the cyan-colored diamond on the back cover.

Now that you’ve completed all of the steps, you should have something that looks like our Cruise Ship Adventure Presentation Folder Template. Of course, you should feel free to make tweaks whenever necessary.
Conclusion
Take what you’ve learned today and apply the fundamentals to come up with something that’s truly unique. The tile effect on this folder doesn’t have to be rounded rectangles-it could be circles, hexagons or even some weird abstract shape nobody’s ever seen before.
We’d love to see what you come up with, so please leave a comment below and share your work with us. If you come up with something unique, we just might feature it in our Folder Design Gallery.


