When you order a Company Folders product, our die-cut templates act as your canvas when you construct your artwork.
If you’ve download your desired template but need help editing it or applying your design, let this handy tutorial be your guide.
![]()
Step 1: Open or place the die-cut template in the program of your choice.
If you are using Adobe Illustrator, you can simply open the template file directly. However, when saving your project, make sure you do not overwrite the original template file if you wish to use it again.
For InDesign or Photoshop, you will have to manually place the template into your document:
- Open a new document with a starting canvas size large enough to fit the entire folder size, including pockets, while still leaving a ¼” bleed gap all around. The recommended starting layout is 22″ x 20″ for a standard-sized folder template. Try not to leave excessive white space around the template.

- Create a new layer and place the template into the layer.
- In either Photoshop or InDesign, click File > Place and select the template file.

- You can also simply drag the actual template file itself into the program of your choice and place it onto the canvas to quickly open it.
- In either Photoshop or InDesign, click File > Place and select the template file.
Step 2: Create the second side of your folder.
Some templates have two layers, one for each side of the folder. Others include an entirely separate file for each side. If yours does not and you wish to create a project with two-sided printing, then you will have to create a separate file for the layout of the second side. If you do not wish to use two-sided printing, you can skip this step.
- In Illustrator, open the original template file. For Photoshop or InDesign, create a new file, the same size as your first, and place the template using the directions from Step 1.
- Select the transform option to flip the template horizontally. This will indicate the second side of the folder.

Step 3: Edit pocket slits.
If a folder design comes with free pocket slits, all of the slit options will be shown in the template file. You will have to delete any pocket slit options you don’t plan to order.
- For Illustrator: The pocket slits will be shown as vector images, so you can simply select the slits, ungroup them, and delete the ones you aren’t using.

- For InDesign/Photoshop: Since the template is imported as a raster image, you cannot cleanly eliminate the unused slit options. Instead, create a new layer and trace over the slits you are using with the line tool to act as a placeholder.

Note: Be careful not to change the position of the cuts or alter the shape or size, as this is considered a custom die-cut and will require additional charges.
Step 4: Create a new layer for your artwork and begin crafting your design.
Do not create your design on the layer that shows the die cut—always place your design on a separate layer. Some of the templates will have an extra layer added where you can place your artwork. If your template does not, you will have to create a new layer for the artwork.
- For Illustrator/InDesign/Photoshop: Select the top layer of your project in the Layers panel and click the Create New Layer button. This will create a layer on top of your current layer.

Now that you have a new layer open for your artwork, you can begin creating your folder design layout or import a pre-existing design using the File>Place feature.
Avoid common mistakes when using your die-cut template:
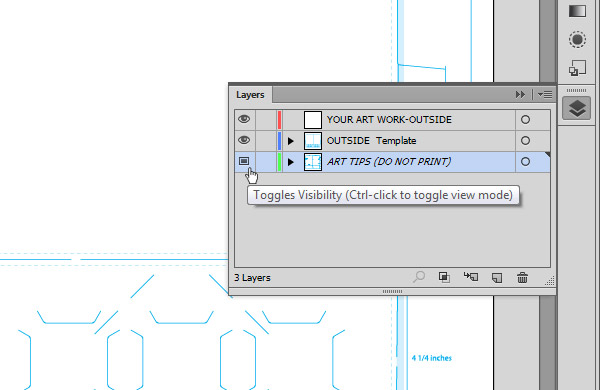
- Turn off any “Print Tip” layers in the template. You can make them invisible by clicking on the eye icon in the Layers panel next to the corresponding layer. If you do not turn these off, they can show up in your final printed design.
- Do not use the color swatch labeled “dieline,” as this indicates to the printer where cuts should be made in the project.
- Do not change the dieline swatch to a different color or rename it.

- Do not modify the template’s shape or size. If you do modify the template’s layout (with the exception of removing unused pocket slits), it will require the use of a custom die cut to print, which is an additional cost.
Is your folder ready to print?
We highly recommend that you download the Folder Design Cheat Sheet for detailed instructions on how to ensure that your custom folder design prints accurately.
This post is a part of our Presentation Folders 101 product guide.