If you think that cropping a photo is just as simple as cutting it down to the size you need for your print layout, then you’re missing out on all that the crop tool has to offer. Think of the crop tool as an invisible frame that draws the eye towards the most important aspects of your photo. Making the right cuts in your photo can have a drastic impact on the visuals and can even manipulate the way the audience engages with it emotionally.
If cropping has only been an afterthought in your design process, then read on for advice on how to use the crop tool to inject drama and energy into your print designs.
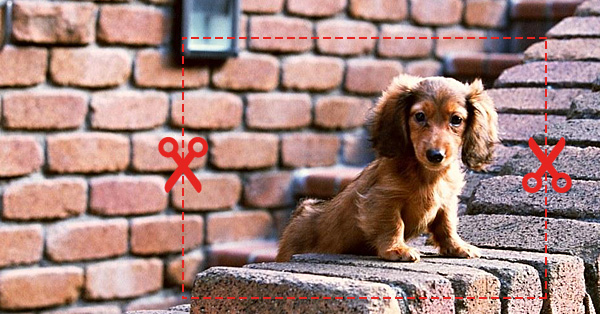
1. Crop your photos to tell a story
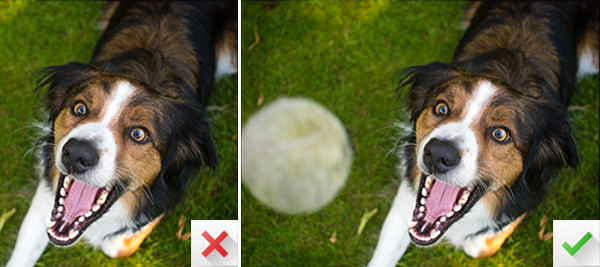
Without the ball in frame, this dog just looks like he’s making a weird face instead of trying to catch something. Be sure not to crop out details that offer essential context.
Photo Credit: tom_bullock
They say a picture is worth a thousand words; the crop tool is what gives you the power to turn those thousand words into a story. You can’t exactly begin to crop a picture until you know what that story is going to be. What message are you trying to deliver to the audience?
Make sure that your photograph still tells that story when you’re done cropping it. You don’t want to cut away any details that might change that story or alter the message in any way. All of the necessary pieces have to be there for the picture to do what it’s supposed to do.
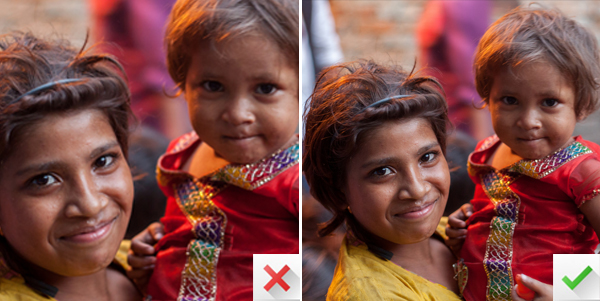
2. Leave out unnecessary details

The bit of yellow balloon that appears in this photo is awfully distracting. Cropping it out redirects focus to the subject.
Photo Credit: Maryland GovPics
It’s equally as important to take out any of the unnecessary details that might distract from the story you’re trying to tell. You don’t want your photograph to end up in a listicle of funniest photobombs, so scour the background for anything that might draw focus away from your subject. Pay close attention to the edges of the photo—the areas furthest away from the subject are the areas that the photographer are most likely to have neglected.
People make for the biggest distractions—our eyes are naturally drawn to faces in photographs. But our eyes are also drawn to text, especially if we can read an entire word or sentence. Anything that breaks the flow of the photograph or draws attention away from the subject should be on the chopping block.
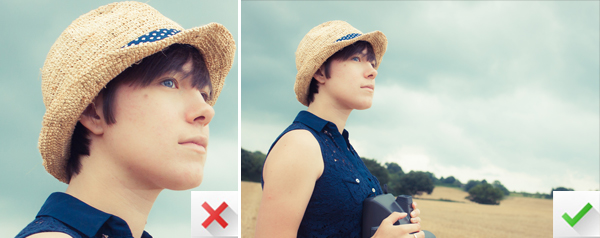
3. Don’t always center your subject

Placing your subject in the dead center can be pretty boring. Try using the rule of thirds to add interest.
Photo Credit: Les Haines
Unless the photo you’re cropping is a portrait or a mugshot, there’s not always a need to make the subject completely centered in the shot. Always remember that the rule of thirds still applies when you’re cropping a photograph, so make sure you frame your subject in the areas that are going to draw the most attention.
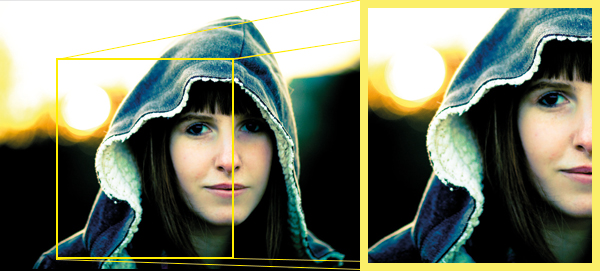
4. Crop at eye level
Keeping your subject’s eyes just below the top third of the image makes them more engaging.
Photo Credit: Denish C
What about when you do want your subject centered, like in a portrait? The rule of thirds still applies. Make sure the subject is centered at eye level (one third down the canvas, or the top horizontal line on a rule of thirds grid). If possible, you’ll want the subject’s eyes to line up with the top two intersections on the rule of thirds grid. This gives the feeling of eye contact, which engages and compels the audience.
5. When cropping faces, leave some breathing room
Don’t crowd your subject’s face by cropping too closely.
Photo Credit: Nathan O’Nions
Don’t crop your subject’s face so close to the edge that it creates a feeling of claustrophobia. Think of the edge of your cropping area as a wall. When you’re standing with your face right up against a wall, it’s easy to feel a sense of anxiety.
That’s how your audience will feel if you crop a subject’s face too close to the edge. On one hand, this can be a handy emotional effect if that’s the style you want to go for. But when the subject is moved back and given some breathing room (also known as “look space”), the picture is much more relaxed and pleasing to the eye.
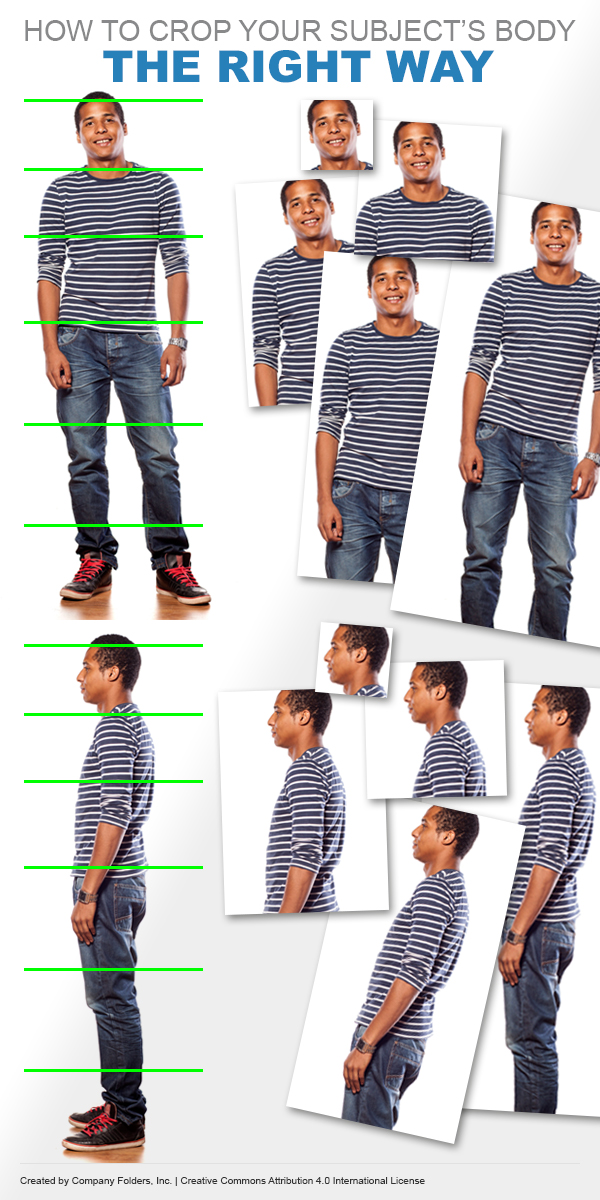
6. Don’t cut off limbs at the joint
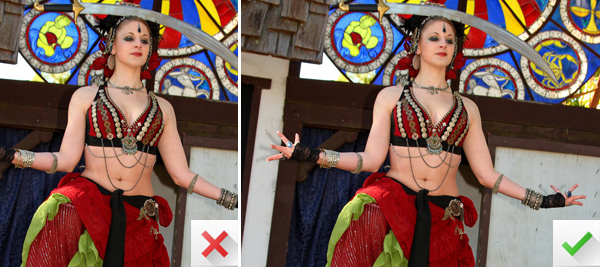
Cropping out your subject’s limbs or hands creates an awkward look.
Photo Credit: Frank Kovalchek
Not to be morbid, but cropping photographs is a bit like being a killer in a horror movie—you’ll often have to make serious decisions about which body parts to cut off.
A general rule of thumb is to avoid cropping people’s limbs at the joint. It creates an awkward visual effect that looks more like an amputation than a framing device. You should also stay away from cropping the little appendages like fingers, toes or even ears. Crop your bodies at the torso, waist, thighs, shin or upper arm to make them less awkward.


This work by Company Folders, Inc. is licensed under a Creative Commons Attribution 4.0 International License.
Embed this graphic on your site
7. Don’t accidentally give your subject a bad haircut

Be careful not to crop too closely to your subject’s hairline.
Photo Credit: Pierre-Olivier Bourgeois
The same thing goes for cropping a head of hair—you have to play the role of a stylist and make sure your subject’s haircut doesn’t leave them looking bald. Don’t crop too close to the subject’s hairline; leave enough hair so that the audience can fill in the rest with their imagination. Alternatively, you can make the cut further down away from the hairline, focusing on the subject’s face instead.
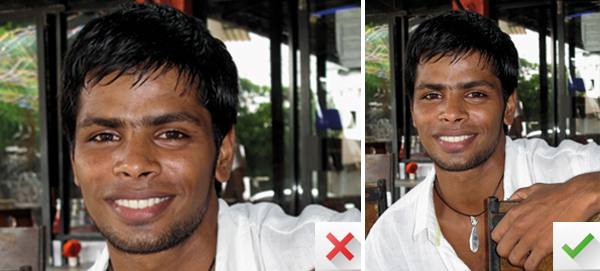
8. It’s okay to crop for cosmetic reasons
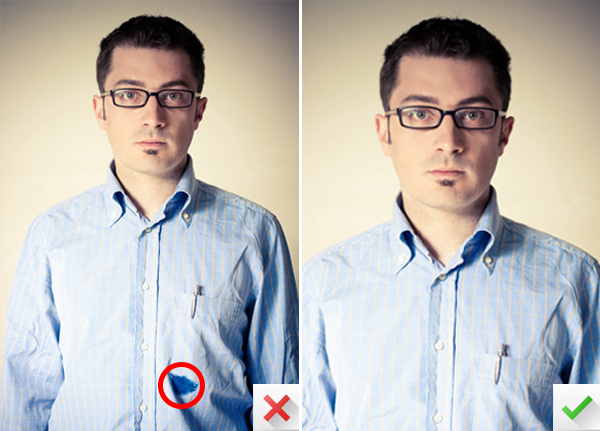
Don’t be afraid to crop out glaring flaws, like the obvious stain on this man’s shirt.
Photo Credit: Daniela Vladimirova
You want your subjects to look their best, so don’t feel guilty about making crops for cosmetic purposes. The crop tool may not be the most refined tool in your photo restoration toolkit—you’re probably not going to be able to use it to remove a blemish from someone’s face. But it gets the job done when it comes to the big stuff like removing a mustard stain from a shirt or tucking away an unsightly belly roll.
9. For a series of photos, keep your cropping consistent
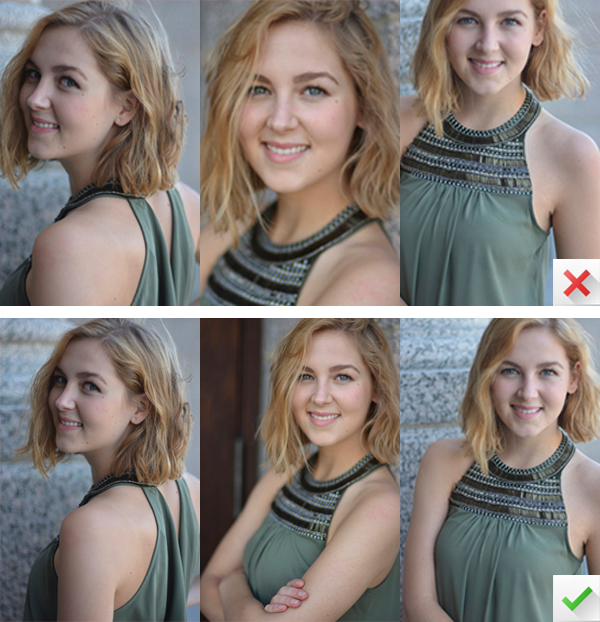
When you’re cropping a series of photos, try to maintain a consistent flow.
Photo Credit: AbigailT
Keep the big picture in mind … literally. The photos you use in a design are only going to account for one small part of the overall collateral, so you need to be aware of how your cuts are going to work in tandem with one another.
When you have a series of photos next to one another, consider making them look more like a yearbook than a comic book. A yearbook has pictures that are all cropped in a similar way to create a uniform look. A comic book has pictures in a variety of sizes and positions because a comic book is meant to be read one picture at a time. That works fine for narrative purposes, but a series of photos cropped in many different ways can be distracting and sloppy if it’s not done intentionally. Unless you’re purposely trying to create movement and flow between each of your photos, keep your cropping and straightening consistent.
10. Don’t accidentally crop out the horizon
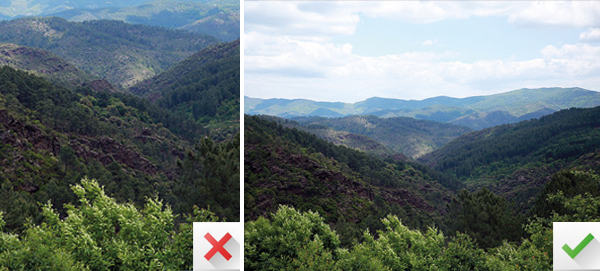
When taking a photo of a landscape, be careful not to crop out the horizon.
Photo Credit: Isabelle Blanchemain
When cropping a photo of a landscape or any photograph with a definitive horizon line, pay close attention to the position of that horizon. Generally, the best choice is keep it at either of the two horizontal lines on a rule of thirds grid. If you cut it too short, the photo will stop looking like a landscape and start to look like an awkwardly cropped photo of whatever the biggest object in the frame happens to be. If the photo is supposed to be a landscape, the focal point of the image should probably be the land itself, and that’s easiest to do with a horizon line.
11. The tighter the cropping, the bigger the drama

Crop closer to a subject to highlight details and emotions.
Photo Credit: David D
When you crop up-close and personal, it creates a bigger sense of drama and pulls a greater focus onto the detail of an object or person. For example, the closer you crop a face, the bigger the features get, which makes it easier for the audience to identify the emotion within that face. The more you focus in on the eyes, the more they grab your attention and create that sense of eye contact and intimacy.
The same thing goes for objects—it’s one thing to crop a photo to focus on an object, but it’s a wildly different experience when you crop the photo so that the object is the only thing you see. It’s even more dramatic when the photo only focuses on one part of the overall object, or is in so tight that the audience can see the finer details.
12. Try cropping with different shapes
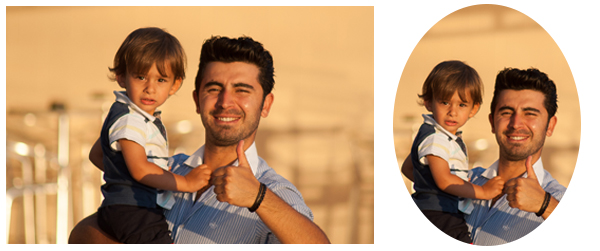
When cropping photos, try being creative with shapes and orientations.
Photo Credit: Ronnie Meijer
The beauty of the crop tool is that it allows you to turn a landscape photo into a portrait or vice versa. Changing the size and shape of your cropping field can have a drastic effect on the nature of the photo itself, especially when you play against the orientation of the original photo.
A golden rectangle is a often a good choice, but you don’t even have to keep your photos a rectangular shape at all, especially when you’re using them for a print design. Your photos could be circular, hexagonal, heart-shaped—whatever works for your design.
13. Just take a little off the top
A little cropping can go a long way. Be careful to use moderation.
Photo Credit: Ylliab Photo
Don’t get all Texas Chainsaw Massacre up in here with the crop tool—you’d be surprised at how much a photo can change with only the smallest of cuts. It is possible to over-crop your photographs, so think of the crop tool as a surgeon’s scalpel. You only want to remove what isn’t working, not hack it to bits.
But sometimes that decision is out of your hands. Size constraints can force you to cut into a perfectly posed photograph just so that you can fit it into your design layout. A good strategy for dealing with a situation like this is to take a little bit off of each side until it’s just right. Just be sure to use baby steps to avoid overcutting.
14. Don’t be afraid to experiment
Cropping in unusual ways can create some very cool results.
Photo Credit: Edd Morgan
Sometimes you need to break the rules to make a bold statement, so don’t be afraid to play around with the crop tool and experiment with different techniques before settling on one design. You can crop the same photo a dozen different ways and come up with drastically different results—it’s all about zeroing in on the one that works best for your needs.
Try cropping at different angles and rotating the picture to compensate, creating a dynamic composition effect. Crop faces in half to create a sense of mystery. Maybe leave in an odd background detail to create contrast with your subject. Don’t be afraid to go off the beaten path—so long as you keep a backup of the original photo, you can always try again if your experiments fail.
15. Crop in-camera to save time
 The best crop tool you have at your disposal is the camera lens itself. If you’re the one taking the photographs for your design, you can eliminate the need to crop later by doing what we call in-camera cropping.
That is, taking everything you’ve learned about cropping and applying it to taking photos. Doing it right the first time can speed up the design process and help you better achieve the look you’re going for.
The final cut
The crop tool operates on rules similar to the resize tool—it’s easier to get smaller than it is to get bigger. Once you’ve trimmed something down, you can only get it back by reverting to old save files, so be sure to make multiple backups and don’t overwrite the original.
Be sure to check out our roundup of Photoshop tutorials for more detailed cropping techniques.
Got a useful photo cropping tip that we overlooked? Leave a comment below and share your favorite.


I usually take photo in all possible angle. As a former Art Director, when a specific cropping photo is needed, example a cover magazine, you need to have THAT PICTURE in your photo-shoot. It happened that I sent photographer to do a photo session and asked him that all possible poses, angles and full body pictures is needed, they brought cropped photos that later needed to be fixed by adding the missing part, either the body or the background. So, is better for me to take full body and close up in landscape and portrait mode so I CAN crop the photo as needed in any ad, magazine or even picture frames.
Dang people, it’s advice, be nice.
As with any feedback, start with something that works and follow it with your constructive criticism with evidence that supports your opinion.
As someone who teaches photo basics to beginners, this is a great place to start.
I do usually tell my students to take several shots if they can, some cropped and some not so that they have both versions of information to work with.
Thank you!
You can use the Photos editing tools to easily make simple changes to your photos, such as rotating them or cropping them to get the best framing. Cropping an image is a great way to cut out anything unwanted, so you can control the image composition as you need to and add an amazing perspective.
I think cropping are an important factor of photography. Hete the author is conveying the basics. Some of the remarks and comments are uncalled for. This attitude is also typical of armchair sportsmen. Dont read the article if you disagree and go and write tour own.
Most of my photography is Sport, typically Cricket and Rugby. I use cropping on most of my photos to isolate the action and make it stand out, removing the unwanted grass. or sometimes to ‘zoom’ in to something special. Sometimes I crop to just balance the photo or improve the composition.
I have seen so many photos that could have been improved by careful cropping and editing.
In my opinion, if a tool is available e.g. in Photoshop, it’s there for a good reason, that reason is to help the photographer to improve his photos.
There is a tool called Face Crop Jet. It detects faces from pictures and crop it automatically in no time.
Thanks for a detailed blog post. There are a few free photo editing tools that easily help you to enhance your photos. I love https://watermarkly.com/crop-photo/ cause it allows to crop, resize, compress and watermark images in one go. Also I can straighten the horizon using the app. It is really very simple.